Quality Management System
DIN ISO 9001:2015 certified
DIN ISO 9001:2015 certified
2% online discount
Fast delivery, reduced
costs from €250
costs from €250
More than 300.000
Products
Products
+49 89 716 77 31-10
info@analytics-shop.com
Correct crimping of sample bottles in laboratories
Crimping is a daily procedure in most laboratories and is essential for the proper storage of products. Therefore, the correct way to crimp is extremely important. Below is a summary of important facts, tips, product examples, and ways to identify crimping errors. If you have any questions, please do not hesitate to contact our team.
Types of Crimp Applicators
There are two types of crimpers: manual and electronic.
Manual crimpers
- Easy-to-use
- Good chemical resistance of surface coating
- Stainless steel crimping tools suitable for clean rooms use
- Adjustable with set screw
- Product examples: manual crimpers (11 mm), manual crimpers (20 mm)
Electronic crimpers
- Safe, tight and reproducible crimping
- Quick and easy cap removal
- Ergonomic design and the ability to crimp at the touch of a button allow a large number of vials to be processed in a short period of time
- Product examples: electronic crimpers (11 mm), electronic crimpers (20 mm)
Proper Use - Demonstration Video and Troubleshooting Guide
For your reference, here is a video and chart demonstrating the proper use of manual and electronic crimping tools and how to spot errors.
Correct Crimping and Possible Errors
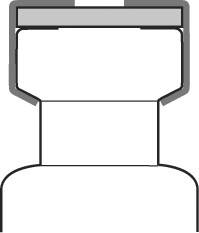
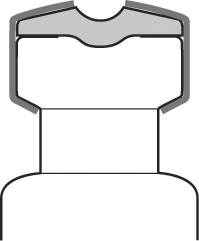
Correct Crimping
- Flat cap surface
- Flat septa surface
- Tight fit of the aluminum cap edge
- Flat and undamaged cap sides
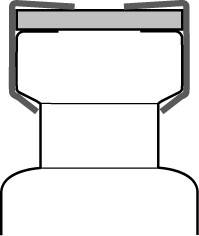
Error 1: Non-adhering aluminium cap edges
- Adjust the crimping pressure using the adjusting screw in the handle
- Adjust the flaring height using the Allen key
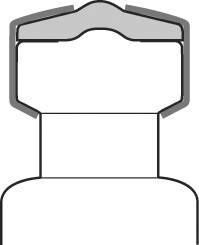
Error 2: curvature of the crimp cap
- Adjust the crimping pressure using the adjusting screw in the handle
- Adjust the crimping height using the Allen key
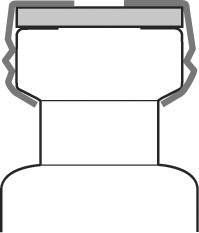
Error 3: deformed cap sides
- Adjust the crimping height using the Allen key
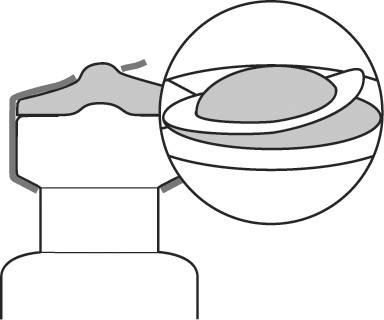
Error 4: Convex-looking seal
- Adjust the crimping pressure using the adjusting screw in the handle
Error 5: Rounded cap edges/curved cap/disc shifts upwards
- It is particularly important not to overcrimp head space caps. If the aluminium is pulled too far under the rolled edge, the retaining webs of the predetermined breaking lines suffer from too much pressure and break open even at low internal bottle pressure (less than 3 bar) or - in the worst case - even tear in two next to the predetermined breaking lines.